There’s lots to like about Windows 10, but you can make it even better by eliminating some common annoyance.
Windows 10 blends the best features of Windows 7 and 8.1 together, but there are still potential hurdles to overcome if you truly want to enjoy it. In this feature we’ve rounded up 32 annoyances you’re likely to come across with your new operating system, which you might want to change. You’ll discover how to restore features taken out of Windows 10, such as the DVD Player or Windows Media Center, make sure settings are correctly applied to protect your privacy and security, plus resolve issues with the minimum of fuss. Once you’ve worked your way through our list, you’ll have a PC that’s working for you, not the other way round. Without further ado, then, it’s time to get Windows 10 firmly in line…
1) Switch System Restore back on
Don’t ask us why, but Windows 10 disables System Restore by default. The first thing to do, then, is switch it back on. Press the [Windows]+[Pause/Break] keys together to open System Properties and click ‘System Protection’ in the left-hand column. You should see Protection Settings have been switched off for all your drives. Locate your Windows drive (it should be marked ‘System’) and click the ‘Configure…’ button. Select ‘Turn on system protection’ and allocate up to 10% of your available space using the slider. Click ‘OK’ twice to finish the job.
2) Bring back Libraries
The Libraries feature may be niche, but it can also be incredibly useful. If you’ve upgraded from Windows 7 you may be wondering where they’ve gone – thankfully they’re still present, but hidden by default. To bring Libraries back, open a File Explorer window and switch to the View tab on the ribbon. Click the ‘Navigation pane’ button on the left and choose ‘Show Libraries’. Note, Libraries can also be seen if you have ‘Show all folders’ ticked – they’ll appear under the ‘This PC’ section in the Navigation pane.
3) Make recovery disc
What happens if Windows 10 fails to boot? You need a system recovery drive that gives you access to Windows 10’s repair options. You can create a full-blown reinstall disc with these tools (see the next tip) or you can press a spare 1GB USB flash drive into ser vice instead with just the repair utilities in place. To do the latter, plug the drive into your PC, then type ‘recover y’ into the Search box and click ‘Create a recover y drive’ under Settings. Untick ‘Back up system files to the recovery drive’ ticked and follow the prompts to create your drive. Should you need to use it, restart your PC with the drive plugged in to access the tools.
4) Create a reinstall disc
It also pays to be able to reinstall Windows from scratch should you need to. You’ll need a blank DVD or spare 8GB USB flash drive. First, download the Windows 10 Media Creation Tool from www.microsoft.com/en-gb/softwaredownload/windows10 – choose the 32-bit or 64-bit depending on your system type (press [Windows]+[Pause/Break] and look under System if you don’t know this). Now launch the tool. Select ‘Create installation media for another PC’, click ‘Next’ and follow the prompts to select your language, edition and architecture (32-bit or 64-bit). Insert your USB flash drive, or create an ISO file you can then burn to a single DVD.
5) Save bandwidth
Did you know that Windows 10 uses peer-to-peer technology to deliver Windows updates? What this means is your internet connection is used to share updates you’ve downloaded with other users. If you’re on a slow broadband connection, or you’d rather not let Microsoft do this you can change it. Click ‘Start’ and choose ‘Settings’. Select ‘Update & Security’ and click ‘Advanced options’ under Windows Update. Next, click ‘Choose how updates are delivered’ and either switch the feature off or select ‘PCs on my local network’ to further cut bandwidth usage by only sharing the updates between PCs in your home.
6) Where’s your product key
If you’ve taken advantage of the free Windows 10 upgrade offer, then you won’t have been given a product key. You won’t need it going for ward – you can note it down using Belarc Advisor (www.belarc.com), but what you’ll discover is it’s identical to everyone else who has upgraded to the same version of Windows (whether it’s Home or Pro) as you. Should you need to reinstall Windows, skip the bit where you’re asked for a product key and Microsoft will recognise your PC as legitimate and activate it with no problem.
7) Restore the Start screen
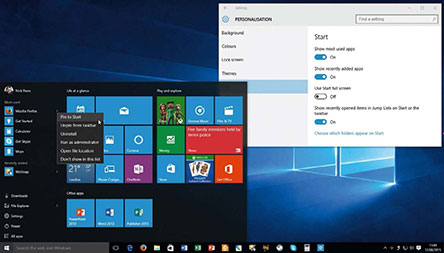
If you prefer the full-screen Start screen experience from Windows 8 and 8.1, click ‘Start > Settings’ and go to ‘Personalisation > Start’. Flick the ‘Use Start full screen’ to ‘On’ and when you next click the Start button the menu will appear full-screen, with the tiles given all the space they need. Click the menu button in the top left-hand corner to reveal the new Start menu’s left-hand pane with the shortcuts to ‘Most used’ and ‘Recently added’ apps, plus File Explorer, Settings and power buttons as well as the ‘All apps’ menu.
8) Lose the File Explorer ribbon
We’ve loved the File Explorer since its introduction in Windows 8, but if you’re not a fan of its ribbon interface, then you can disable it and restore the Windows 7 look using a program called OldNewExplorer – download it from http://tihiy.net/files/OldNewExplorer.rar. You’ll need a program capable of extracting RAR files to use it – tr y 7-Zip (www.7-zip.org). Once extracted, launch the program and click ‘Install’, then tick the various boxes to change how File Explorer looks – close and reopen any File Explorer windows to see the effects.
9) Customise the hidden Start menu
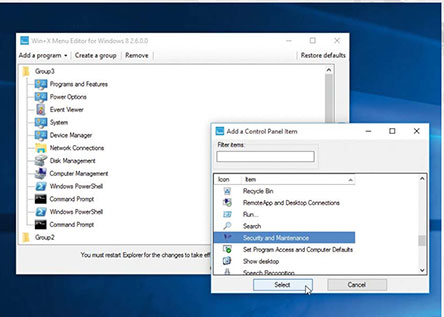
Like Windows 8 before it, Windows 10 has a hidden Start menu – press the [Windows]+[x] keys or right-click the Start button to access it. The menu includes handy shortcuts to hidden parts of your system such as the old Control Panel, Run dialogue box and Event Viewer. But why stop there? Add your own, or rearrange and delete existing shortcuts courtesy of the Win+X Menu Editor. Download the zip file from http://winaero.com/download.php?view.21, right-click it and choose ‘Extract All’ to save it to a suitable folder.
10) Restore classic Start menu
If you’ve upgraded from Windows 7, you might not like the new Start menu at all. If you’re hankering for the ‘classic’ style, then download and install Classic Shell from www.classicshell.net. During installation, untick all entries except ‘Classic Start Menu’ and ‘Classic Shell Update’. Once it’s installed, click the Start button to configure it – the default settings should be fine, so click ‘OK’. The classic Start menu blends in with the Windows 10 look, but provides settings and shortcuts you’ll be more familiar with – there’s even a shortcut to the Windows 10 Start menu too.
11) Add shortcuts
Once extracted, browse to the x64 (64-bit) or x86 (32-bit) folder, then double-click WinXEditor.exe to start tweaking. Click the ‘Add a program’ button and choose ‘Add a program’ to manually browse for a program, or ‘Add preset’ for options such as shutdown and restart entries. You can also easily add individual Control Panel applets and administrative tools, including Disk Cleanup, Task Scheduler and more. Organise applications into groups, and remove any you don’t need. Click ‘Restart Explorer’ to update the menu, or ‘Restore defaults’ to undo all your changes if you make a mistake.
12) Disable Cortana
There’s little doubt the Windows 10 search bar is useful, but it links into Microsoft Cortana by default. If you decide you don’t like Cortana’s additional tools, reduce its functionality to that of previous versions of Windows: click the search bar to open Cortana. If you’re using it for the first time, click ‘Not interested’ to disable it; otherwise, click the Settings button and flick the ‘Use Cortana’ switch to ‘Off’. You can also disable the web portion of Windows 10’s search capabilities from here too, restricting searches to files, programs and settings on your PC.
13) Where has the Charms bar gone?
Windows 8’s Charms bar – accessible from the right-hand edge of the desktop – has disappeared in Windows 10… For those who miss it, here’s where you find its tools now: first, the Power and Settings buttons are accessible directly from the Start menu itself, while the Search box on the Taskbar replaces the Search charm. Other Charms, including Settings, Share and Print are now incorporated into Microsoft Store apps – some apps make them available via the hamburger-like menu on the app’s title bar; otherwise they’re hidden inside the app itself.
14) Change default apps in Settings
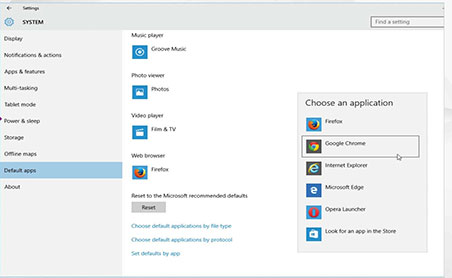
After upgrading to Windows 10, Microsoft changes your default browser to Edge. To fix this manually, click ‘Start >Settings > System > Default apps’. Click the Edge entry and then pick your browser from the list that pops up. You can change other key app defaults here: video, photo, mail and so on. For a wider range of app choices, click ‘Set defaults by app’. Advanced users can also set defaults by file type or protocol using the appropriate links.
15) Change default app by file type
If your app isn’t listed when trying to set it as the default via Settings, try this instead: browse to a file you want to open, then right-click it and choose ‘Open with > Choose another app’. Then tick the ‘Always open this app…’ box before selecting your chosen default. If it’s not in the list, click ‘More apps’ to reveal more choices, and if your chosen program still isn’t there, click ‘Look for another app on this PC’ to manually select it. Start your search under Program Files or Program Files (x86).
16) Tighten privacy in Edge
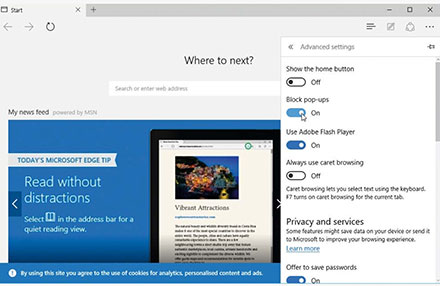
If you stick with Edge, there are some important privacy settings you need to switch on before relying on it. Launch the browser, then click the ‘…’ button in the top right-hand corner and choose ‘Settings’. Scroll down and click ‘Advanced settings’ and make sure the ‘Block pop-ups’ slider is set to ‘On’. While you’re here, flick ‘Send Do Not Track requests’ to ‘On’, then set Cookies to ‘Block only third-party cookies’ for greater privacy.
17) Access classic Display settings
We’re not massive fans of the new Personalisation dialogue, which is now part of Settings. If you’ve a hankering for the Display Settings dialogue from Windows 7 and 8, create a shortcut to it on the desktop: right-click some blank space and choose ‘New > Shortcut’. Type the following into the Location box: control.exe desk.cpl,Settings,@Settings Click ‘Next’, give it a suitable name and click ‘Finish’, then use this shortcut to tweak display settings.
18) Customize the Start Menu
Alternatively, take the time to make the Start menu your own using the ‘Personalisation > Start screen’. Click ‘Choose which folders appear on Start’ to pin folders to the Start menu. You can also resize the Start menu to alter its height and width – just click and drag on its top or right-hand edge to do so. Drag it to the right to add columns to display more of your tiles on-screen at once. You can then pin apps from the ‘All apps’ list here (right-click the app and choose ‘Pin to Start’), then drag them into groups or whatever order you choose.
19) Bring back Gadgets
There are many good reasons for leaving Gadgets alone – some can pose a security risk after all – but if you’ve upgraded from Windows 7 and can’t live without them, you can restore them using 8GadgetPack (http://8gadgetpack.net), which also works in Windows 8/8.1. Not only does it restore full Gadget functionality, but you gain modern improvements such as support for high-DPI screens, allowing you to resize your gadgets for larger displays.
20) Restore Windows Photo Viewer
Microsoft has replaced Windows Photo Viewer with the Photos app, but it’s possible to restore it as an option when setting the default app for photos. It’s a convoluted process – see ‘Method 4’ at www.askvg.com/tip-restoring-windowsphoto-viewer-as-default-in-windows-10/ but, the site provides a ready-made zip file containing the required Registry entries. Download this to your hard drive, then open it to access the .reg file within. Double-click this and choose ‘Run’ followed by ‘ Yes’ (twice) – to make Windows Photo Viewer an option again.
21) Restore Briefcase
It had niche appeal, but the Briefcase was one of the earliest tools for keeping data synced between two locations. While it’s been removed from Windows 10 (and 8), you can get it back again with a Registry tweak. Download the required file from http://winaero.com/blog/wp-content/uploads/2012/09/Briefcase.zip. Double-click it to open it, then double-click Windows 8-Enable Briefcase. reg. Click ‘Run’ followed by ‘ Yes’ twice, then restart Explorer via Task Manager to restore its features. Note, it doesn’t work well with User Account Control, so don’t create Briefcases inside any administrator-protected folders.
22) Bypass login
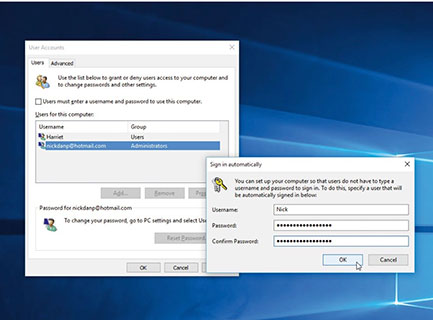
If you’re the only user of your PC and you’d like to boot straight to the desktop without having to enter your password each time, here’s what to do. First, press [Win]+[R] to open the Run dialogue box, then type netplwiz and press [Enter]. Make sure your user account is selected, then untick ‘Users must enter a username and password to use this computer’ and click ‘Apply’. Enter your user password and click ‘OK’ twice. Windows will also require you to enter your password after your PC wakes from sleep. If security isn’t an issue, click ‘Start > Settings > Accounts > Sign-in options’ and change the ‘Require sign-in’dropdown menu to ‘Never’.
23) Watch DVDs on your PC
Windows Media Player loses the ability to play DVD video in Windows 10 (as it did in Windows 8 before it). You can purchase Microsoft’s Windows DVD Player for £11.59 from the Store, but why do that when VLC Media Player allows you to watch DVDs – including non-region 2 discs – for free? Just download and install it from www.videolan.org/vlc. Before you play any movies, open the Video menu and choose ‘Deinterlace > Automatic’ to improve the picture quality.
24) Replace Windows Media Center
Windows Media Center has also been dropped from Windows 10. There are plenty of free alternatives, but our personal recommendation is Kodi (www.kodi.tv), which also has a built-in DVD player. If you have a TV tuner attached to your PC for watching and recording live television, then you’ll also need NextPVR (www.nextpvr.com) along with the CCCP pack (http://www.cccp-project.net/). Visit http://kodi.wiki/view/NextPVR for a guide to pairing NextPVR with Kodi.
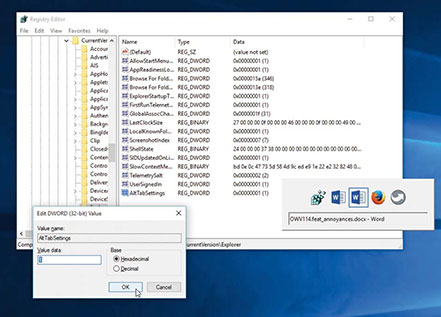
25) Restore classic
[Alt]+[Tab] switcher Press [Alt]+[Tab], and Windows 10 displays a list of thumbnails for all open windows. If you’d rather stick with the old look, press [Win]+[R] and type ‘regedit’ to open Registry Editor. Browse to the following key: HKEY_CURRENT_USER\SOFTWARE\Microsoft\Windows\CurrentVersion\Explorer. Now select ‘Edit > New > DWORD (32-bit) Value’. Name it AltTabSettings. Double-click the value and set it to 1. Now restart Explorer from Task Manager to restore the icon task switcher.
26) Tame Quick Access
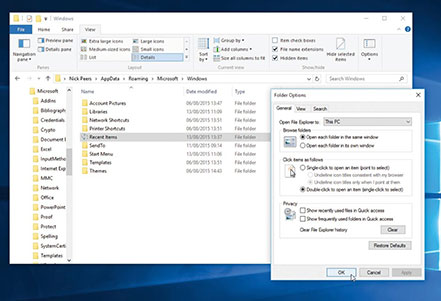
The Quick Access menu replaces both Recent Places and your Favourites folder in File Explorer’s Navigation pane, but it can be a bit of a mess, mixing pinned icons, frequently accessed folders and recent items. Open File Explorer, switch to the ribbon’s View tab and click ‘Options’. You can disable the latter two items via the Privacy boxes, plus instruct File Explorer to open to the This PC view instead of Quick Access if you wish. You can also pin the old Recent Places shortcut to Quick Access too: press [Win]+[R], type ‘%AppData%\Microsoft\Windows\’ and press [Enter]. Right-click the Recent Items shortcut and choose ‘Pin to Quick Access’.
27) Disable Wi-Fi Sense
If you connect wirelessly to your network, then the Wi-Fi Sense feature, which connects you to crowdsourced Wi-Fi hotspots and networks shared by your contacts, is enabled by default if you choose Express Settings during the Windows 10 upgrade process. It’s designed to make it easier to connect to friends’ networks through your Facebook, Outlook.com or Skype contacts list, but if you’d rather not share this information, make sure you disable it. Click ‘Start > Settings > Network & Internet > WiFi’. Click ‘Manage WiFi Settings’ and flick both switches to ‘Off ’ to prevent your network details being shared with others.
28) Resolve any HomeGroup issues
A number of people have struggled to connect to their existing HomeGroup after upgrading to Windows 10. Start by running the HomeGroup troubleshooter, which you can access via the HomeGroup Control Panel (type ‘homegroup’ into the Search box to locate it). If this doesn’t yield a solution, Google ‘homegroup problems’ and click the first result in the list (‘HomeGroup problems in Windows – Windows Help’). Work your way through the suggestions underneath ‘I can’t create, join or use a HomeGroup’ – don’t worry that it’s written for Windows 8; the solutions apply equally to Windows 10 too.
29) Improve the Windows Update
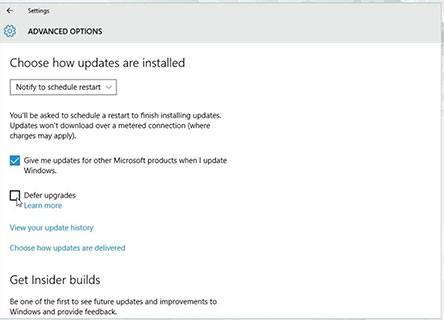
By default Windows Update now delivers all updates automatically. While you can’t put them off indefinitely, go to ‘Settings > Update & Security > Windows Update > Advanced Options’. Windows 10 Pro users can select ‘Defer upgrades’ to put off non-security updates for several months. Windows 10 Home users should set ‘Choose how updates are installed’ to ‘Notify to schedule restart’ to get alerts that updates are about to be installed. Home users with Wi-Fi connections can also postpone updates by going to ‘Settings > Network & Internet > WiFi > Advanced Options’ and flicking the ‘Metered Connection’ switch to ‘On’ until you’re ready to update.
30) OneDrive changes
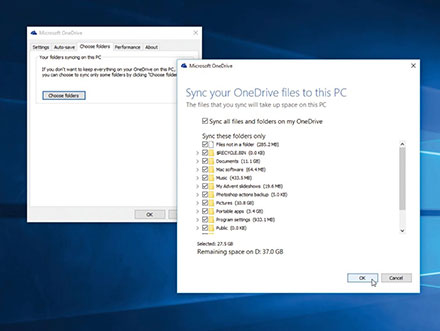
One of the best features of OneDrive in Windows 8 was the ability to use ‘placeholders’ for certain folders, effectively giving you access to your stored files without having to also hold a copy on your hard drive. Sadly Windows 10 ditches this feature (for now); instead you need to specify which folders you want to keep synced on your PC. To do this, right-click the OneDrive icon in the Taskbar Notification area and select ‘Settings’. Switch to the Choose Folders tab and click the ‘Choose Folders’. Untick ‘Sync all files and folders on my OneDrive’ and then tick only those folders you need access to.
31) Restore Solitaire
Microsoft has made Solitaire freemium in Windows 10 – you’ll need to download the app from the Store, then pay a subscription fee to remove the ads. If this is too much, try Solitaire Collection Free from the Store instead – it’s also ad-supported, but you can pay a one-off fee of £2. 29 to remove them. If you’d rather play on your desktop, then download 123 Free Solitaire from www.123freesolitaire.com instead – the download you want is the second on the download page. This is ad-free, and comes with 12 games. Configure how it works by clicking ‘Game > Autoplay’ and exploring ‘Tools > Options’.
32) Remove unwanted apps
Windows 10 ships with a number of built-in apps such as Mail, Money and Groove Music. If you don’t like any of these, Microsoft doesn’t provide an Uninstall option. However, you can still ditch them with the help of IOBit Uninstaller 5 (www.iobit.com/advanceduninstaller.php). Once installed, open the app from the ‘Start menu > All apps menu’, then select Win Manager from the left-hand menu and select Windows Apps. Expand the Windows Apps section where you’ll see all the apps listed. Click the dustbin next to one to remove it. Any apps can be restored later through the Store.
33) Run older apps
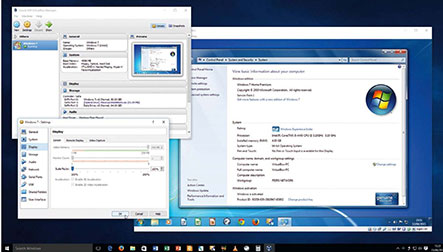
Most apps that work in Windows 7 and 8 should also work in Windows 10, but if your app won’t work then all may not be lost. If you still have access to a non-OEM copy of an older version of Windows, you can install it in a virtual machine courtesy of VirtualBox (www.virtualbox.org). This basically lets you create a virtual PC inside Windows 10, into which you can install your old programs while you look for a compatible update or suitable alternative.
34) Recover hard drive space
Once you’re up and running with Windows 10, and convinced you won’t need to go back to your previous version of Windows, it’s time to free up drive space. Open File Explorer, go to This PC, right-click your C drive and choose Properties, then click the Disk Clean-up button. As soon as the dialog opens, click ‘Clean up system files’ and wait for it to scan again. Go through the list ticking those items you don’t need – the biggest item by far will be ‘Previous Windows installation(s)’. Tick this to free up space, but remember there’s no going back once the files are gone.
Source from Windows 7 Tips & Tricks Magazine
















0 Response to "Windows 10 fixes – your problems solved"
Post a Comment